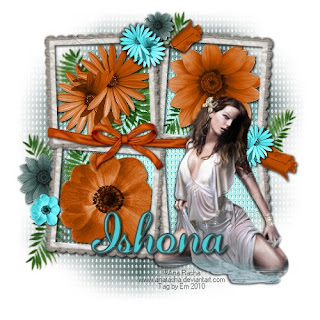
This tut was written by me, Em Jay, on 1-12-10 with all rights reserved. Please do not copy and paste it in any group or call it your own. You can link to it using a link to my blog.
This tut is written using a very colorful ptu kit created by Athena Designs called Mediterranean Dawn which you can find here
It was written using PSP9, but is surely adaptable to any version and is for people with a good working knowledge of PSP. Let’s get started!
Open a new transparent image 500 x 500, flood fill using white. This will give us a nice background to build our tag on.
Open two different colored papers from Athena’s Mediterranean Dawn Scrap kit that complement the tube you will be using. Select all, add new raster layer and copy and paste one of the papers you chose into selection. Do not deselect! Add another new layer and copy and paste the other paper of your choice into selection. Deselect
Open a mask of your choice and click on Layers/New mask layer/from image. Select your mask and click ok. Merge group. Highlight your second paper layer and repeat the steps above to add your mask, merge group.
Highlight your top layer, Image/resize (make sure your pixel dimension is set to percent and the box on the bottom to resize all layers is UNCHECKED.) Width and height should be set to 80. Click on Image/rotate/free rotate (make sure the bottom two boxes are UNCHECKED) Use 90 degrees either left or right. Click ok. Close off your bottom transparent layer then merge all visible. You should now only have two layers.
To add a little texture to your background, highlight your top layer. Effects/texture effects/mosaic-glass. You can use the random dice to come up with a look that you like. Click OK.
Go back to the kit and open Athena_MD_multiframe_1TS. Resize the frame by 60%. Copy/paste as a new layer over your top layer. Add a nice drop shadow.
Now the fun begins! This kit contains some very bright, contrasting-colored flowers. Choose one color for your big flowers that will go behind the frame and open three different flowers. Resize them all by 35%. Copy and paste each one as a new layer on your tag. Add a drop shadow to each one. Then drag each of the flower layers below your frame. You can rotate them using your deform tool so they each fit nicely under your frame.
Open Athena_MD_leaves2TS. Resize it by 15% to be used as little accents to your flowers. Adjust/sharpness/sharpen one time. Copy and paste as many as you would like to use each on it’s own layer. Drag them to where you want them and then drag them down below the flowers. You can see how I just randomly placed them behind the three flowers I used.
Open Athena_MD_ribbon 1, 2 or 3, whichever color you wish to use and resize it by 40%, mirror it. Copy and paste the ribbon over the middle of your frame, add a drop shadow.
Now you can copy and paste a main focal tube of your choice as a new layer on top of the ribbon layer. The tube I used is FTU ©Ana Rasha, http://anarasha.deviantart.com. Cover as much of the bottom right window as you can, adjusting its size and rotation as you see fit with the deform tool. Add a drop shadow.
Now go back to the kit and select three different colored flowers. I tied all my colors together by choosing one that was the color of the bottom paper, top paper and color I used for my big flowers. You can resize each one by 15%. Sharpen each one once. Add a nice drop shadow. Then copy and paste them in little clusters around your frame and tube, using some on top of the frame and a couple under the frame. Use your deform tool to make any adjustments to size and rotation of these little flower accents. Add the same leaves you used behind the big flowers here and there. Once you are satisfied with how your tag looks, merge visible.
Now it’s time to add the text of your choice and all copyright information required for the use of the tube you selected. Merge flat and export as a .jpeg. You’re done!
I hope you’ve enjoyed creating your tag with this tutorial!

No comments:
Post a Comment